
Requirements
Hardware
- Orange Pi One

- Orange Pi One Case

- 16GB SanDisk Ultra microSDHC Class 10 (or similar)
- DS18B20 Temperature Sensor

- PlugableTerminal and cable connector for temperature Sensor (or similar)

- Optional: PoE Splitter 5V with 4.0mm x 1.7mm Male Adapter (for Orange Pi One)

You can find temperature kits by searching for DS18B20 Temperatures Sensor Module Kit
- https://www.aliexpress.com/w/wholesale-DS18B20-Temperature-Sensor-Module-Kit-.html
- https://www.amazon.ca/s?k=DS18B20+Temperatures+Sensor+Module+Kit
Software
- Armbian Image - Orange Pi One - Armbian
- Etcher for Windows - balenaEtcher - Flash OS images to SD cards & USB drives
Flash Latest version of Armbian to the SD Card
Extract the Armbian Zip file and use balenEtcher to write it to the SD Card
Boot the Orange Pi unit with the flashed SD card
Set root password and configure regular user account and password
Connect to the unit using Putty (or another SSH client)
Run the following commands:
apt update && apt upgrade
Install optional packages
apt install vim-tiny
Set up 1-wire (w1-gpio) and connect sensor
Add the following lines to /boot/armbianEnv.txt
overlays=w1-gpio
param_w1_pin=PD14
param_w1_pin_int_pullup=1
Take note of param_w1_pin, this can be changed to a different pin if need be (see pinout below)
Add the following lines to /etc/modules-load.d/modules.conf
w1-gpio
w1-therm
Wire up the Temp Sensor
Reference: DS18B20 on OrangePi with Armbian | Jake’s Blog (ja-ke.tech)
Connect your temp sensor like the diagram below (or connect to the pin entered in armbianEnv.txt)
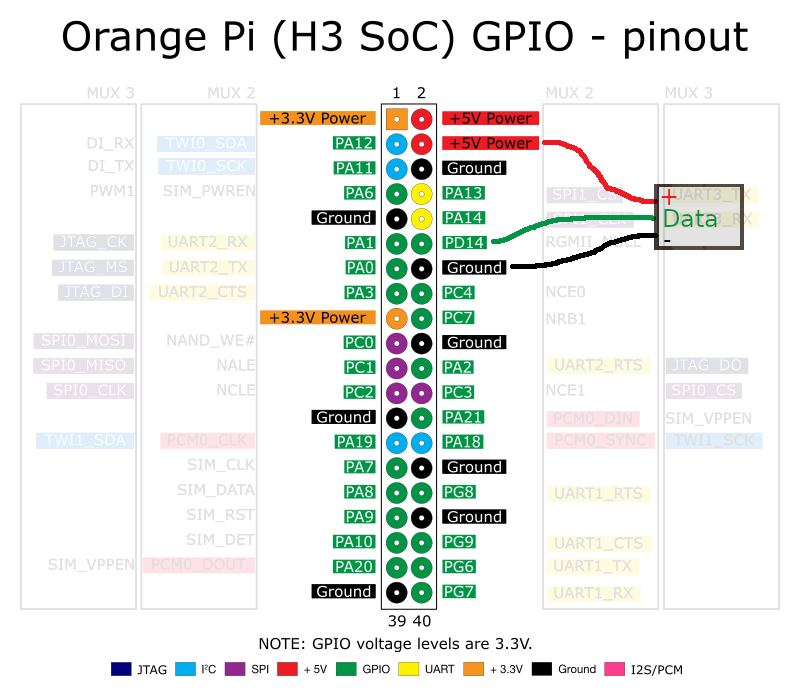
PHOTO CREDIT: Jake's Blog (See above)
For the temperature sensors I bought the wires were coloured as follows:
- YELLOW: Data
- RED: +5V
- BLACK: Ground
Testing Temperature Sensor
Run the following command after you have rebooted
# dmesg | grep wire
You should see something link the following if you have connected one sensor correctly
[ 5.615661] Driver for 1-wire Dallas network protocol.
[ 5.625414] gpio-110 (onewire@0): enforced open drain please flag it properly in DT/ACPI DSDT/board file
[ 5.657643] w1_master_driver w1_bus_master1: Attaching one wire slave 28.3c01e076fc86 crc 7e
Take note of the ID for the wire slave (above 28.3c01e076fc86)
Run the following command (using the ID of our unit, note change the period to a hyphen)
cat /sys/bus/w1/devices/28-3c01e076fc86/w1_slave
You should see something like the following
74 01 55 05 7f a5 81 66 28 : crc=28 YES
74 01 55 05 7f a5 81 66 28 t=23250
The temperature above is detected as 23.250 degrees Celsius
Note: if you want to connect multiple sensors, just add them with each color combined (YELLOW, RED, BLACK). You may want to add one at a time to figure out the unique device ID of each wire.
Configure Zabbix
Install zabbix agent
apt install zabbix-agent
Enable the Zabbix Agent Service
systemctl enable zabbix-agent.service
Add the following contents to /etc/zabbix/zabbix_agentd.conf.d/temp.conf
ServerActive=zabbix-server.name
Server=zabbix-server.name
Hostname=temp01.local

UserParameter=PiTemp[*],/bin/cat /sys/bus/w1/devices/28-$1/w1_slave | grep 't=' | /usr/bin/awk '{print $$10}' | /bin/sed 's/t=//g'
UserParameter=PiTempDiscover,ls /sys/bus/w1/devices/ | grep 28- | awk 'BEGIN { print "{\"data\":["; FS="-";} {print t "{\"{#PITEMPID}\":\""$2"\"}"} {t=","} END {print "]}"}'
Test from your Zabbix server or proxy server using zabbix_get
# zabbix_get -s 192.168.0.2 -k PiTempDiscover

{"data":[
{"{#PITEMPID}":"01205f8e6ed9"}
,{"{#PITEMPID}":"3c01e076fc86"}
]}

# zabbix_get -s 192.168.0.2 -k PiTemp[3c01e076fc86]

23.312
Recommended minimal hardening Debian Operating System
Set up Unattended Upgrades
Reference: UnattendedUpgrades - Debian Wiki
Install required packages
apt install unattended-upgrades apt-listchanges
The default configuration file for the unattended-upgrades package is at /etc/apt/apt.conf.d/50unattended-upgrades. The defaults will work fine, but you should read it and make changes as needed.
vi /etc/apt/apt.conf.d/50unattended-upgrades
You should at least uncomment the following line:
Unattended-Upgrade::Mail "root";
Set up secure SSH Login
Digital Ocean provides a detailed article on setting up secure SSH login
It is recommended you set a secure root password and save it to a secure password database
# passwd root
New password:
Retype new password:
Set up SSH key based auth for root user
# vi /root/.ssh/authorized_keys
Disable Password based SSH login (either all users, or just for root)
# vi /etc/ssh/sshd_config

#Disable SSH passwords (recommended for highest security)
PasswordAuthentication no

#Only prohibit passwords for root (medium security)
PermitRootLogin prohibit-password
Optional: Delete extra user created during installation
Since the only purpose of logging into this system will be for system management, there is little need for a separate non-root user. Delete the extra user to lower the attack surface.
# deluser firstusername
Removing crontab ...
Removing user `firstusername' ...
Done.
Zabbix Template
Attached is a Zabbix Template that monitors and graphs the temperature sensors.
You can provide custom names for the sensors on the Host Macros. For example:
$PITEMP.MAX is the high temperature alert threshold
$PITEMP.MAX.DELAY is the time that the temperature must be above the level to trigger a warning
$PITEMP.MIN is the low temperature alert threshold
$PITEMP.MIN.DELAY is the time that the temperature must be below the level to trigger a warning
$PITEMP.NAME is the custom sensor name to be displayed in alerts
Comments
0 comments
Please sign in to leave a comment.